Sunday, May 18, 2014

Speccy

Speccy

System Information

SpeccySpeccy is an advanced System Information tool for your PC. Need to find out what's inside your computer? No problem! Speccy will give you all the information you need.

Overview

What's in your computer? If you're like most of us, you can probably name the processor (Intel or AMD, Celeron or Pentium), maybe how much RAM it has, and maybe how big the hard drive is.
When you go to a computer store and see all the bright shiny PCs laid out next to each other, most will have tags or stickers indicating the:
  • Processor brand and model
  • Hard drive size and speed
  • Amount of memory (RAM)
  • Graphics card
  • Operating system
Two or three years later, when it comes time to upgrade your computer, that tag or sticker may be long gone. Speccy was designed as a free electronic "what's inside" sticker for your PC.
Isn't this information in Windows?
Yes and no. Some of the basic information can be found by right-clicking My Computer and then clicking Properties. The General tab lists some statistics, and the Device Manager on the Hardware tab lists all of the hardware you've got installed. But it misses out lots of information that you need.
Speccy will give you detailed statistics on every piece of hardware in your computer. Including CPU, Motherboard, RAM, Graphics Cards, Hard Disks, Optical Drives, Audio support. Additionally Speccy adds the temperatures of your different components, so you can easily see if there's a problem!
Why do I need Speccy?
At first glance, Speccy may seem like an application for system administrators and power users. It certainly is, but Speccy can also help normal users, in everyday computing life.
If you need to add more memory to your system, for example, you can check how many memory slots your computer has and what memory's already installed. Then you can go out and buy the right type of memory to add on or replace what you've already got.
If you're going to be selling your PC, you can use Speccy to quickly list out the components. Or, if you're buying a PC, you can use Speccy to check that the computer has what the label says it has.
Also, Speccy comes in handy for support. If you're on the phone with technical support and they want to know what video card you have installed, there's no need to hunt around Windows. Speccy has all the information on one easy-to-understand screen.

Secure Data Disposal 1.3


During the retirement phase of the PC life cycle, many companies dispose of their PCs without proper removal of confidential data. This can cause a serious concern as information on the hard drives can be retrieved by unauthorized people.
Our tool for Secure Data Disposal is known as SCRUB3. SCRUB3 is indifferent with respect to the operating system on a hard drive. It will ensure that any critical data is permanently removed from a PC before it is disposed.
Whether a PC is being cascaded in an organization or being retired, IT organizations will benefit from the following:
  • Data, programs, and any possible viruses will be destroyed on a PC before a new image is loaded.
  • Sensitive and/or confidential information will be destroyed permanently.
Secure Data Disposal (SDD) is a Windows tool used to build IBM PC-DOS boot floppies for the purpose of wiping hard drives. Each boot floppy utilizes the Scrub3 DOS executable to facilitate securely disposing of data on a system's hard drive.
Consider the following when using this code:
  • USB hard drives are not supported by Secure Data Disposal.
  • Creating SDD boot floppies may produce an error if another program is utilizing the floppy drive.
  • Some floppy diskettes must be formatted before an SDD boot disk can be created.
  • Creating client reports on IntelliStation A Pro machines (model 6224) is not supported.
go to c:\Program Files\ThinkVantage\Secure Data Disposal\ISO\ and open the sdd.iso file in your burning application to burn it manually.
Download Now
Secure Data Disposal (12MB)

Sunday, May 4, 2014

How to use Android Device Manager: track and wipe a lost or stolen smartphone

Remotely locate and protect your Android devices with Google’s equivalent to Find my iPhone.

Apple users have long enjoyed the ability to track their devices if they were lost or stolen (see How to track a stolen or lost iPhone).
The Find My iPhone option has been proudly touted as an anti-theft measure, with stories online of people recovering their iPhone by turning up at the perp's door with the police in tow.
Now Android has added a very similar feature called the Android Device Manager for GPS-equipped smartphones and tablets. It allows you to locate your lost device and also change passwords, lock screen PINs, and even remotely wipe your missing unit.
Here's how to set up your phone or tablet to use the service, so the next time your Nexus 7 falls behind the sofa you’ll be able to track it down.

Setting up Android Device Manager

Step 1
First need to head over to www.google.com/android/devicemanager where you’ll be prompted to accept Google’s request for location data. As this is a tracking service it’s necessary to do this for the feature to work properly.
How to use Android Device Manager - Step 1
Step 2
If you already have a Nexus device with location services turned on then it should automatically appear on your list. Here you’ll see the current position of your handset, along with the last time it was used.
How to use Android Device Manager - Step 2
Step 3
To switch between devices click on the name and a drop down menu will appear. Select another model and you’ll be taken to the map screen for that one instead. You can also rename each device by clicking on the pencil icon.
How to use Android Device Manager - Step 3
Step 4
To step up a new device you’ll need to visit the App Store on the handset itself, then search for the Android Device Manager app. There are a few similar apps, so look for the one with the green circle and target in the middle.
How to use Android Device Manager - Step 4
Step 5
Tap the install button and you’ll be presented with another Welcome screen requesting to use your location data. As in Step 1 you’ll need to agree to this if you want to use the service. Tap Accept and you’re ready to go.
How to use Android Device Manager - Step 5
Step 6
The screen now looks remarkably like the one in Step 2, this is because the Android Device Manager app basically uses the web interface to run the service. Once your device has found a GPS signal it should appear on the drop-down menu.
How to use Android Device Manager - Step 6
Step 7
Now you can take a closer look at the features available. Beneath the device name there are two different icons - Ring, and Set up Lock & Erase. We’ll look at how each of them work in turn, starting with Ring.
How to use Android Device Manager - Step 7
Step 8
Selecting the Ring option will allow the app to make your device announce itself at maximum volume for five minutes, even if it’s locked and set to vibrate. This is particularly useful if you’ve lost it somewhere in the house.
How to use Android Device Manager - Step 8
Step 9
Selecting Setup Lock and Erase will return a dialog box telling you that you need to send the device a notification. Tap Send and you’ll see a message appear in your notification bar for Android Device Manager, tap this.  
How to use Android Device Manager - Step 9
Step 10
You’ll now be taken to the settings for the app, where a pop up box will ask if you want to activate the device administrator? Agree to this and your device will now have access to all the security features.
How to use Android Device Manager - Step 10
Step 11
The Lock option will now allow you to remotely create a new password for the lock screen, while Wipe is the choice of last resort. Essentially it’s a factory reset which  removes all of your data from the device.Very effective in the event of a theft.
How to use Android Device Manager - Step 11


Read more: http://www.pcadvisor.co.uk/how-to/google-android/3500315/how-use-android-device-manager/#ixzz30mZUYdMe

Sunday, April 6, 2014

SnapPea

YOUR ANDROID, HERE IN CHROME

Sign in with Google to connect to your phone. It's fast and secure.

Download SnapPea for Windows
Learn More
  • TEXT MESSAGE LIKE A PRO

    Send messages from your existing phone number. Amaze friends with your speed ;-)
  • INSTANT ACCESS TO YOUR PHOTOS

    Take a photo on your phone and it appears on your computer in just a few seconds. View, download, or share to Facebook.
  • KEEP YOUR CONTACTS NEAT AND TIDY

    Edit all your contacts from your computer. Add new friends and delete the old ones.
  • MANAGING APPS IS SUPER EASY

    View all the apps installed on your phone. Install new apps from APK files. Uninstall apps you don't like.

Now start using SnapPea

Sunday, March 30, 2014

ShowBox


Show Box

Movies and TV-shows for free!

Amazing collection of Movies and TV-shows. Absolutely free. You can download them on your Android device or watch online.

Download Show Box

Friday, March 7, 2014

Download BlueStacks – Start playing Android Apps Right Now

bluestacks-app-player-mid-2

Download BlueStacks

The situation may be different. Discharged battery of the smartphone, flew all the apps from your phone, etc. the List is very long. And well, if the applications that you were on your phone, for you now is not critical. However, there are times when you urgently need to use these applications. What if the phone is not working? To run the application on your computer, you can use the BlueStacksBlueStacks program, serving as the emulator, which allows you to load and work with Android applications on your computer. The program is intuitive and simple interface, can switch to full-screen mode and supports all applications and games on Android. In the package already includes several applications, for example, a tool that allows to work with youtube, which allows us to evaluate the possibilities of the program. We note that the program is completely compatible with all popular operating systems, and it means, that you will not have any problems with running this application.
Program features
- Supports all versions of applications on the basis of Android, regardless of which version of the operating system they were written.
- Easy and intuitive user interface.
- Very low system requirements.
- The program works well on all popular Windows operating systems.
- The ability to switch the program window in full-screen mode allows you to see only the window of the program without unnecessary buttons and third-party Windows.
- Ability to easily migrate applications from your phone and your computer.
- Ability to set an unlimited number of games and applications.
- Can get full access to the file system.
- You can install any game from Google Play.
Program BlueStacks is a completely free product.
System requirements
- Processor clocked at 2200 MHz or more powerful.
- RAM 2048 MB or more.
- Graphics card with VGA memory size not less than 256 MB or more powerful.
Free space on the hard disk 750 MB.
- Any sound card for audio playback.
Architecture with a capacity of 32-bit or 64-bit (x86 or x64).
- Operating system Windows XP, Windows Vista, Windows 7, Windows 8
Interface BlueStacks – multilingual.
Released in two versions: for Windows XP/Vista/7 and separately for Windows 8

Windows XP/Vista/7apps

Windows 8


apps

Friday, February 28, 2014

Feeling Exploited? We have you covered.
Malwarebytes Anti-Exploit BETA protects you from zero-day exploits targeting browser and application vulnerabilities. Its proprietary technology protects you in that critical period between the release of a new exploit and its security patch. And, unlike antivirus products, Malwarebytes Anti-Exploit BETA proactively prevents the exploit from installing its payload. Before it can do damage.

Features

Shields software vulnerabilities

  • Lightweight
  • Runs silently in the background
  • Install and forget—no management necessary
  • Compatibility with anti-malware and antivirus products
  • No signature database—no need for daily updates

Browser protection

  • Internet Explorer
  • Mozilla Firefox
  • Google Chrome
  • Opera
  • Java, Flash, Shockwave, Acrobat, and any other browser plugin

Application protection

  • Microsoft Word
  • Microsoft Excel
  • Microsoft PowerPoint
  • Adobe Acrobat Reader
  • Adobe Acrobat PRO
  • Foxit Reader

Monday, February 3, 2014

Bizagi

About Bizagi Process Modeler

Bizagi is a business process modeling and documentation tool.  The modeler enables you to visually diagram, model and document business processes in industry-standard BPMN (Business Process Model Notation). BPMN is a worldwide accepted format for process modeling.

You are able to publish high quality documentation in Word, PDF, Sharepoint or Wiki.  Processes can be easily imported from and exported to Visio or XML, and other tools.  The modeler’s Intellisense (smart code completion) coupled with its unique look and feel allows you to quickly and easily map and document, without the delay of validation routines.

All processes are saved with a .bpm file extension.  Each file is referred to as a model and may contain one or more diagrams.
A model can refer to a whole organization, a department or a specific process depending on your needs.  Multiple diagrams are positioned as individual sheets (tabs) within your model.  You are able to navigate between diagrams in your model by selecting the associated sheet tab located at the bottom of the model.

Creating a process1


About Process Modeling

Process modeling is a method to analyze, design and diagram a business process flow.  Modeling a process in an iterative, clear, transparent and straightforward way will enable you to understand, analyze and make a positive change to the business process.

Tuesday, January 28, 2014

How to Run Plex Media Server as a Windows Service with AlwaysUp

Ensure that Plex starts when your computer boots and is always available to serve your media. No need to log in!

Plex Media Server is a free "digital hub" for sharing media across all your Plex-enabled devices.

To setup Plex Media Server with AlwaysUp 6.0 and later:
  1. Download and install AlwaysUp, if necessary.
  2. Download and install the Plex Media Server, if necessary. Please make a note of where you installed it as this will be used in a later step.
  3. Start AlwaysUp.
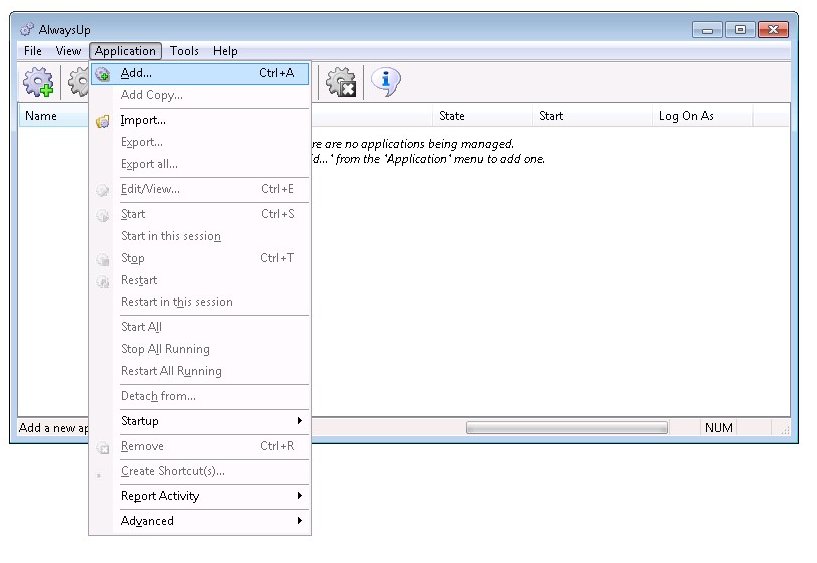
  4. Select Application > Add to open the Add Application window:
    Add Application
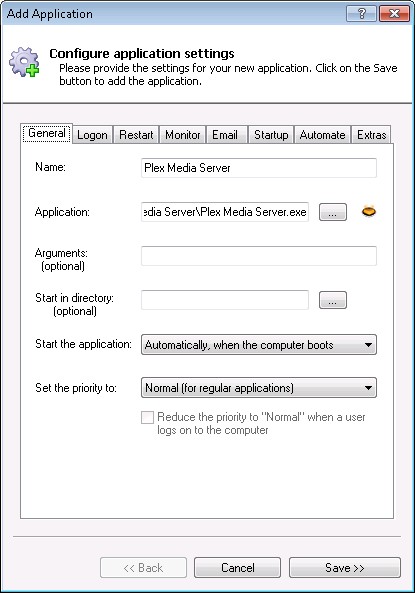
  5. On the General tab:
    • In the Application field, enter the full path to the Plex Media Server executable, Plex Media Server.exe. If you installed Plex in the default location, this is:
      C:\Program Files\Plex\Plex Media Server\Plex Media Server.exe
    • In the Name field, enter the name that you will call the application in AlwaysUp. We have entered Plex Media Server but you can specify almost anything you like.
    Plex Media Server Windows Service: General Tab
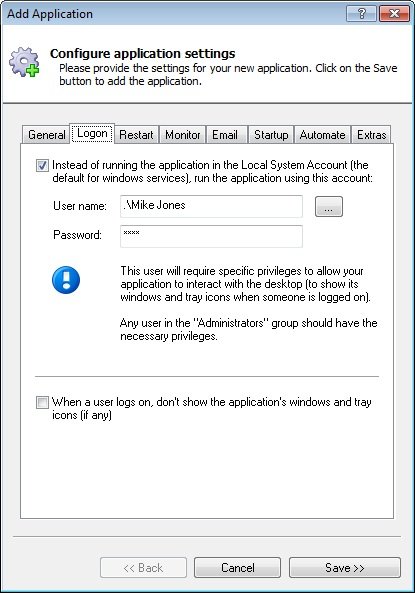
  6. Click over to the LogOn tab and enter the user name and password of the account in which you installed and configured Plex Media Server. Plex must run in this account so that it can find its settings.
    Plex Media Server Windows Service: LogOn Tab
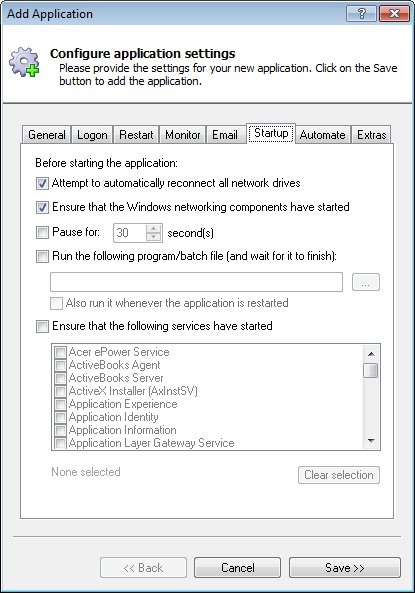
  7. Click over to the Startup tab and check the Ensure that the Windows Networking components have started box. This informs AlwaysUp that the media server needs the TCP/IP networking stack to operate.
    Plex Media Server Windows Service: Startup Tab
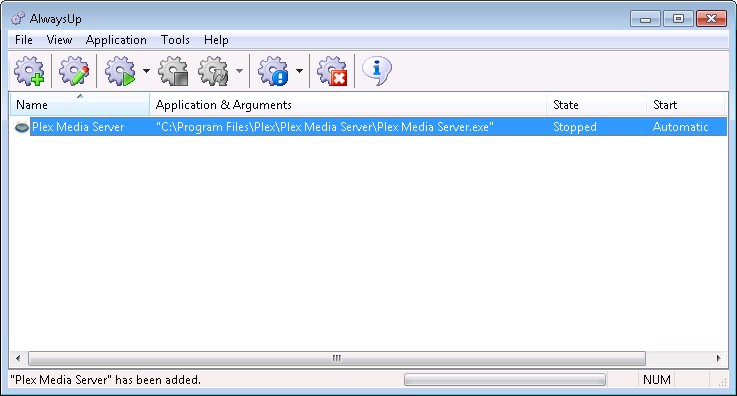
  8. Click the Save >> button. In a couple of seconds, an application called Plex Media Server will show up in the AlwaysUp window. It is not yet running though.
    Plex Media Server Windows Service: Created
  9. Before we start Plex as a Windows Service, we must prevent a second copy from starting when you log on. To do so:
    1. Start Plex Media Server if necessary (Start button > All Programs > Plex Media Server > Plex Media Server)
    2. Right-click on the Plex Media Server tray icon (Plex Media Server Tray Icon) and un-check Start Plex Media Server at Login if it is checked.
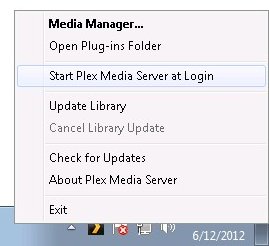
      Stop Plex Media Server Start at Login
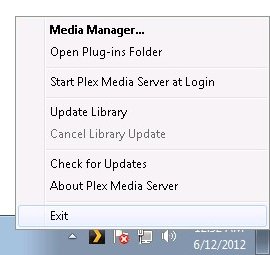
  10. If Plex Media Server is running, close it now by clicking on the tray icon and selecting Exit from the menu. AlwaysUp will not be able to start Plex Media Server properly if it is already running.
    Exit Plex Media Server
  11. Starting Plex as a service at this stage will run it in Session 0 - the desktop hosting all Windows Services. Plex works fine like this on Windows XP and 2003 but versions prior to 0.9.7 may run into trouble on Windows 8/7/Vista, and Server 2012/2008 where Session 0 is isolated and Plex's tray icon cannot "attach itself" to a task bar.
    If you are using Plex version 0.9.6.9 or earlierplease follow steps 1-8 of this tutorial to provide a task bar in Session 0. Once complete, start the new Explorer service you created by selecting Application > Start "Explorer".
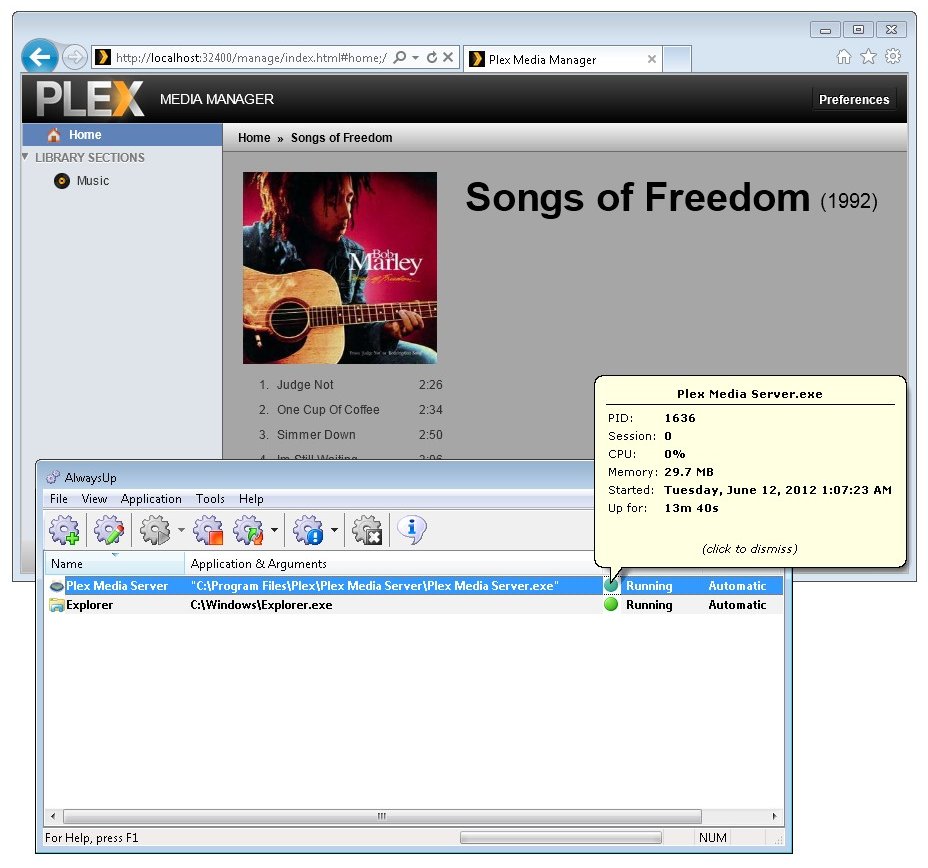
  12. To start Plex from AlwaysUp chooseApplication > Start "Plex Media Server". Note that you probably won't see Plex's tray icon appear as it is running in the background but media sharing should proceed normally.
    Plex Media Server Windows Service: Running
    On Windows 8, 2012, 7, 2008 or Vista (or when connecting via RDP), choosing Tools > Switch to Session 0... will take you to Session 0 where you can interact with the Plex Media Server tray icon.
  13. That's it! Next time your computer boots, Plex Media Server will start up immediately, before anyone logs on. We encourage you to edit Plex in AlwaysUp and check out the many other settings that may be appropriate for your environment.


Plex Media Server not working properly as a Windows Service?

  • From AlwaysUp, select Application > Report Activity > Today... to bring up a HTML report detailing the interaction between AlwaysUp and your application. The AlwaysUp Event Log Messages page explains the more obscure messages.
  • Check the Plex logs for error messages. The files can be found in C:\Users\\AppData\Local\Plex Media Server\Logs.
  • During testing on our Windows 7 computer, we encountered a peculiar situation where Plex would not run if we stopped it in AlwaysUp and started it from the Start button. The server log (C:\Users\\AppData\Local\Plex Media Server\Logs\Plex Media Server.log) recorded a puzzling error - "Access denied". Fortunately we were able to resolve the issue with little fuss by running Plex as an Administrator (just once). Strange indeed.
  • Consult the AlwaysUp FAQ for answers to commonly asked questions and troubleshooting tips.
  • Contact us and we will be happy to help!